
Your 3D moon lamp won’t turn on. It doesn’t charge. The colors won’t cycle. You’ve tried different cables, outlets, and even a power bank, but nothing works. You’re not alone. Thousands of users face the same problem, and most failures trace back to one fragile component: the micro USB port. This guide reveals exactly why your moon lamp stopped working and how to fix it permanently, whether you’re a beginner or a DIY pro.
You’ll learn how to diagnose power issues, repair broken connections, and upgrade your lamp for long-term reliability. No guesswork. No wasted time. Just proven solutions from real repair cases and technical specs.
Diagnose Power & Charging Problems
Before tearing anything apart, confirm where the failure lies. Most moon lamp not working issues fall into three categories: power supply problems, battery depletion, or internal circuit damage.
Test Your Power Source First
Start with the simplest fix: rule out bad cables or adapters. Many moon lamps use standard 5V USB power, but some require 12V. Check your lamp’s label or manual.
• Plug into a known-working wall adapter, not a computer USB port
• Try a different USB cable, preferably a short, high-quality one
• Test with a phone charger that outputs at least 1A
If the lamp still doesn’t respond, move to the next step.
Check Battery Voltage with a Multimeter

The internal lithium-ion battery is likely a 3.7V LiPo cell. A fully charged cell reads 4.2V, while below 3.0V means it’s deeply discharged or damaged.
- Open the base of the lamp carefully
- Locate the battery and identify the positive and negative terminals
- Set your multimeter to DC voltage (20V range)
- Touch probes to the correct terminals
Results indicate above 3.5V means the battery has charge and the problem lies in the charging circuit. Below 3.0V means the battery may be dead or needs slow recharging. A reading of 0V indicates an open circuit or disconnected battery requiring wiring inspection.
Never charge a swollen or damaged battery. Replace it immediately.
Look for Physical Damage Signs
Inspect the inside of the base for frayed or pulled loose wires, corrosion or moisture, and black marks, burnt smell, or discolored PCB. Any of these indicate deeper electrical issues requiring repair.
Identify Common Failure Points
Most moon lamps fail the same way: repeated plugging and unplugging weakens the micro USB port. Over time, solder joints crack, cutting off power entirely.
Cracked Solder Joints at USB Port
This is the number one cause of moon lamp not charging. The micro USB connector is tiny and mounted directly to the PCB without strain relief. Every flex breaks the solder slightly more until connection fails.
Visual clues include the lamp working only when the cable is held at a certain angle, intermittent charging or flickering lights, and complete power loss after minor handling.
Use a magnifier to inspect the back of the PCB. Look for hairline cracks around the USB pads, lifted or detached pins, and cold solder joints with a dull, grainy appearance.
Failed Charging Module or Driver Board
Some lamps use a small charging IC (like TP4056) to manage battery input. If this fails, the battery won’t charge even with good input. The lamp powers only when plugged in (bypassing battery), and there may be overheating near the board.
Damaged or Burnt LEDs
If the lamp turns on but only part of the moon lights up, colors are missing or dim, or one section flickers, you may have a failed LED or disconnected strip. These are usually SMD 2835 or 5050 types wired in parallel.
Repair Cracked USB Connections
If the lamp has no power and you suspect a broken micro USB joint, here’s how to fix it.
Reflow Solder Joints (Quick Temporary Fix)
If the port is still intact but connections are cracked:
- Disconnect the battery to avoid shorts
- Heat each pin of the micro USB port with a soldering iron
- Add a small amount of fresh solder and flux to improve flow
- Hold the connector steady, don’t let it move while cooling
This often restores function but won’t last long under regular use. It’s a band-aid, not a cure.
This method works if done quickly and cleanly but fails again in weeks due to ongoing stress.
Replace Micro USB Port
If the old port is loose, bent, or unsoldered:
- Desolder all pins using a desoldering pump or braid
- Remove the damaged connector
- Install a new micro USB surface-mount or through-hole port
- Solder carefully and reinforce joints with hot glue
The same weak design means it’s likely to fail again.
Upgrade to Barrel Connector (Permanent Fix)

The best long-term solution is replacing the micro USB with a barrel jack. This upgrade eliminates the fragile port and adds durability, especially in homes with kids.
Why Barrel Jacks Last Longer
• Thicker pins resist bending
• Secure screw-fit design prevents wobble
• Easier to strain-relieve with glue or grommet
• Widely available and low-cost
Many repairers report zero repeat failures after this mod.
Required Tools and Parts
• Barrel jack (5.5×2.1mm or 2.5mm) costing $1–2 on AliExpress
• DC power adapter (5V output)
• Soldering iron with fine tip
• Hot glue gun
• Dremel or drill bit (4–5mm)
• Wire cutters, multimeter, flux
Step-by-Step Installation Guide
1. Disconnect the Battery
Always start with the battery unplugged. Locate the connector on the PCB and gently pull it off.
2. Remove Old Micro USB Port
Desolder all terminals. Clean the pads with flux and braid. Inspect for lifted traces.
3. Drill Hole for Barrel Jack
• Mark center point on the base
• Use a Dremel or drill to make a pilot hole
• Enlarge with a heated soldering iron if needed for snug fit
• Deburr edges to prevent wire cuts
4. Insert and Secure the Jack
Slide the barrel connector from underneath. Point it straight up.
Apply hot glue around the base. Avoid covering the threads or terminals. Let it partially set, then trim excess.
5. Solder Wires to PCB
Cut two short wires (red for positive, black for negative). Solder the center pin (positive) to the VCC pad where USB positive was. Solder the outer sleeve (negative) to the GND pad.
Double-check polarity with a multimeter.
6. Clean and Finalize
Remove solder splashes or flux residue. Reheat glue slightly to reposition if needed.
7. Reconnect Battery and Test
Plug in the 5V adapter and check for immediate power-on, touch control response, smooth color cycling, and no overheating or flickering.
If all functions work, close the base and enjoy your restored lamp.
Label the new adapter “Moon Lamp” to avoid mix-ups.
Replace Dead LEDs or Strips
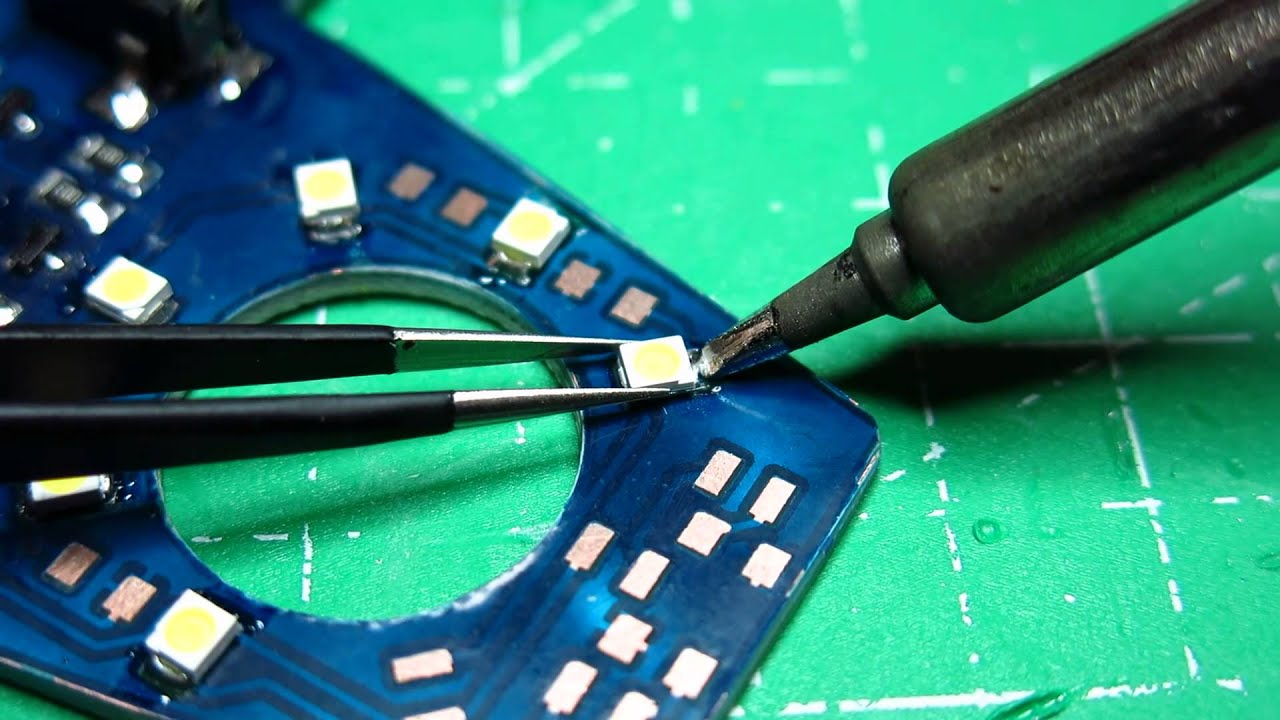
If the lamp powers on but parts are dark, the LEDs may be damaged.
Identify LED Specifications
Most moon lamps use SMD 2835, 3528, or 5050 LEDs driven at 3.0–3.3V and configured in parallel with current-limiting resistors. Do not apply 12V directly, as this will burn them out.
Replace Entire Strip (Easiest Method)
- Disconnect battery
- Gently peel off old LED strip from inside the moon
- Measure length and buy a replacement (warm white or RGB)
- Solder new strip to driver board pads
- Test before reassembling
Ensure the new strip matches voltage and connector type.
Repair Individual SMD LEDs (Advanced)
Use a fine-tip iron to desolder the dead LED, clean the pads, and solder new SMD in place. This is only recommended if you have precision tools and steady hands.
Upgrade Battery and Charging System
Extend lifespan by replacing old batteries and adding protection.
Install a New LiPo Battery
Choose a 3.7V 500mAh–1000mAh polymer cell that fits inside the base.
- Disconnect old battery
- Cut wires and strip ends
- Solder new battery in place
- Secure with foam tape
Always match polarity. Reversing kills the board.
Add TP4056 Charging Module (Recommended)
This tiny board safely manages charging and prevents over-discharge.
Wiring involves connecting IN+ and IN− to barrel jack (input power), B+ and B− to battery, and OUT+ and OUT− to lamp (load).
The benefit is that even if the battery dies, the module protects the circuit.
Prevent Future Failures
Once repaired, protect your moon lamp from repeating the same fate.
Avoid USB Cable Stress
• Don’t yank the cable out by the cord
• Plug and unplug by the connector
• Use a short cable to reduce pull tension
Use Wall Adapter, Not Computer USB
Computer ports can deliver unstable power. Always use a wall charger rated for at least 1A.
Clean Touch Sensor Regularly
Over time, oils and dust block capacitive touch response.
• Power off the lamp
• Dampen a cotton swab with isopropyl alcohol
• Wipe the touch area gently
• Dry completely before use
Repair vs Replace: Is It Worth Fixing?
Here’s the truth: most moon lamps cost $20–$60. Repair parts cost under $10.
| Factor | Repair | Buy New |
|---|---|---|
| Cost | $2–$8 | $20+ |
| Time | 1–2 hours | 0 |
| Skill | Intermediate | None |
| Longevity | High (with mod) | Medium (same flaws) |
| Eco Impact | Low (reuse) | High (e-waste) |
If you care about value and sustainability, repair wins every time.
Fixing it also preserves sentimental value, especially if it’s a gift.
Final Tips for Lasting Results
For DIYers: Upgrade Early
Even if your micro USB still works, replace it now. Prevent failure before it happens. A barrel jack mod takes 90 minutes and pays off for years.
For Beginners: Try Simple Fixes First
- Test with a different 5V adapter
- Try a new USB cable
- Clean the charging port with compressed air
- Hold the power button for 10 seconds (some lamps have reset functions)
If none work, consider professional help or a modular repair kit.
For Parents and Gift Givers
Choose or modify lamps with durable connectors. Kids move night lights often, and micro USB won’t survive. A barrel jack or USB-C upgrade makes it last.
Key Takeaways for Fixing Your Moon Lamp
The most common reason a moon lamp stops working is a mechanically failed micro USB port. Resoldering offers a temporary fix, but replacing it with a barrel connector delivers lasting reliability. With basic tools and under $5 in parts, you can restore full function and prevent future breakdowns. Whether you’re troubleshooting, repairing, or upgrading, this guide gives you everything needed to bring your moon lamp back to life safely, affordably, and for good.
Frequently Asked Questions About Moon Lamp Not Working
Why does my moon lamp suddenly stop working?
Most moon lamp failures stem from cracked solder joints at the micro USB port. Repeated plugging and unplugging weakens the connection until the lamp loses power entirely. Inspect the USB port with magnification to confirm this issue.
How do I know if the battery or the charging port is bad?
Test the battery voltage with a multimeter. Above 3.5V means the battery has charge and the problem is likely in the charging circuit. Below 3.0V indicates a dead or deeply discharged battery. A reading of 0V suggests an open circuit requiring wiring inspection.
Can I fix my moon lamp without soldering?
Basic troubleshooting includes trying a different USB cable, using a different wall adapter, cleaning the charging port with compressed air, and holding the power button for 10 seconds. For permanent repairs, soldering is required to replace the USB port or upgrade to a barrel connector.
Is it worth repairing a cheap moon lamp?
Yes. Repair parts cost $2–$8, while new lamps cost $20–$60. With a barrel connector upgrade, the repaired lamp becomes more durable than the original. Repair also reduces e-waste and preserves sentimental value.
How long do barrel connector upgrades last?
Barrel connectors are significantly more durable than micro USB ports. Users report zero repeat failures after 6+ months of regular use, compared to original micro USB ports that often fail within 3–12 months.
Can I replace the LEDs if they burn out?
Yes. You can replace the entire LED strip or repair individual SMD LEDs. Match the voltage (typically 3.0–3.3V) and LED type (2835, 3528, or 5050) to your original specifications. Always disconnect the battery before working on LEDs.



