
A wobbly lamp isn’t just annoying, it’s a genuine safety risk. That subtle shake every time you adjust the shade or walk past could mean loose internal parts, worn threads, or even a potential electrical hazard. If your table lamp or floor lamp sways with just a light touch, it’s time to tighten a loose lamp before the problem gets worse. The good news is most fixes take under 20 minutes and require only basic tools found in any household.
This guide covers every common cause of lamp instability, from loose base nuts to worn friction hinges. You’ll learn exactly where to look, what to tighten, when to replace parts, and how to do it safely without damaging the finish or risking shock. Whether you have a vintage ceramic base, a brass floor lamp, or a modern adjustable neck lamp, the solutions here work for all types.
Identify Where Your Lamp Is Wobbling
Before grabbing any tools, you need to diagnose exactly where the movement starts. A loose lamp can wobble at multiple points, and each location requires a different fix.
Gently grip each section of the lamp and wiggle it slightly. Watch and feel for movement at these common problem areas. Base-to-floor movement usually indicates a loose base nut. Neck or stem rotation means the threaded rod needs tightening. Socket shaking points to a loose top nut or internal assembly. Harp or shade shifting suggests the harp nut or base isn’t secured.
If the entire lamp tilts but the base stays firmly on the table, the issue is internal, not at the feet. Conversely, if the base lifts but the stem stays upright, the base connection is your target.
Tighten the Base Nut and Threaded Rod
The threaded rod is the spine of most lamps, running from the base through the stem and into the socket. When this central piece becomes loose, the whole structure wobbles.
Turn the lamp upside down on a soft surface to protect the finish. Look inside the base for a hex-shaped nut on the threaded rod. This nut compresses the internal stack and locks everything in place.
Use a 9/16-inch socket wrench or adjustable wrench to tighten the base nut clockwise. Wrap the tool jaws with masking tape to avoid scratching chrome, brass, or other finishes. Hold the bottom of the holder or stem steady with your hand while turning the nut. If the stem spins with the nut, you’re not creating tension. You need to hold the top part steady to prevent rotation.
Some lamps have a second nut just under the harp base. Remove the harp and shade, then tighten this top nut clockwise before re-securing the harp with the harp nut.
Secure the Socket and Harp Assembly
A shaky socket or harp makes the lamp feel unstable even when the stem is perfectly tight. These upper components need attention too.
Remove the shade, harp, and bulb to access the socket. Check whether you can wiggle the socket itself. If so, the socket shell is loose on the cap. Unscrew the socket cap to expose the socket shell, then use a flathead screwdriver to gently tighten the shell onto the cap. Reattach the cap without forcing it.
For the harp, ensure the legs are fully seated in the harp base. Screw on the harp nut by hand and tighten just enough to hold. Over-tightening can crack the socket insulator. The harp should not move side to side when pressed gently.
Fix Adjustable Lamps with Friction Hinges
Lamps with swivel heads or flexible arms use friction hinges. When they sag and won’t stay in position, the issue isn’t always a loose screw. The tension has simply worn down over time.
Look at the joint to identify the hinge type. Some have a visible set screw. Others have a sealed cap with no external hardware. For sealed caps, slide two razor blades under opposite edges and gently pry upward to pop the cap off. Caps are press-fit, not glued, so they come off with patient leverage.
Once you access the internal screw, use a 1.5mm or 2mm Allen key to turn it clockwise. This increases tension in the friction joint. Test the arm’s hold after each small adjustment until it stays in place, then snap the cap back on.
If the screw spins without tightening, the threads are stripped. You’ll need to replace the hinge or arm entirely.
Replace Worn or Damaged Parts
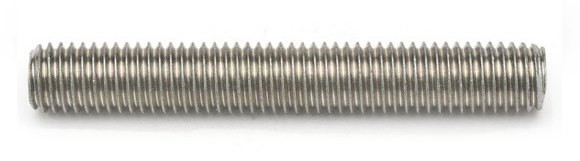
Sometimes tightening isn’t enough. Worn threads, cracked plastic, or corroded rods need replacement rather than repair.
Stripped threads are common in older lamps. Remove the threaded rod or nut and take it to a hardware store to match the size. Standard sizes include 10-32 and 1/4-27. Replace with a brass or steel rod and apply a small amount of thread locker (blue Loctite) to prevent future loosening. Apply this only on non-electrical parts.
Plastic necks in older lamps often crack or strip. Replace with a stamped steel neck, which costs about $3 to $5 online and resists stripping far better than plastic. Adjust the base nut to account for slight length differences.
If the socket wobbles despite tightening, replace the entire socket. Buy a turn-key socket from Amazon, Home Depot, or a lamp repair specialist. Cost is typically under $5. When rewiring, cut the power cord above the socket, strip half an inch of insulation, and attach the smooth wire to the brass screw (hot) and the ribbed wire to the silver screw (neutral). Always tie a UL knot inside the base to prevent pull-through.
Handle Different Lamp Types
Different materials and designs need tailored approaches to avoid damage.
Table lamps are smaller and lighter, making them easier to handle. Focus on the base nut and socket shell. Use pliers wrapped in cloth to avoid scratches. A common mistake is over-tightening the socket cap, which cracks the insulator.
Floor lamps have longer stems, creating more leverage and more wobble potential. Check every joint in multi-arm lamps. Tighten all set screws with an Allen key. Some floor lamps have secondary bolts at the base attachment that need attention too.
Vintage and ceramic lamps require gentle handling because materials are brittle. Work on a padded surface. Use long-nose pliers if hand access is tight inside narrow bases. Avoid adhesives unless you’re replacing broken parts.
Brass, chrome, and brushed nickel finishes scratch easily. Always wrap tools with tape or cloth before use. Clean brass with brass polish before tightening. For chrome, avoid steel wool entirely since it leaves conductive residue that can cause problems.
Use the Right Tools for the Job
You don’t need a full workshop to fix a loose lamp. A few key tools handle most situations.
Essential tools include a 9/16-inch socket wrench for efficient base nut tightening, a hex key set (1.5mm to 3mm) for set screws in hinges, a flathead screwdriver for socket cap removal and shell tightening, long-nose pliers for reaching inside narrow bases, and razor blades for prying off friction hinge caps.
Keep replacement parts handy for quick fixes. Extra nuts and rods in standard sizes, stamped steel necks, turn-key sockets, SPT-1 lamp cord (8-foot, brown), and JB Weld epoxy for broken poles cover most emergency repairs. Home Depot, Lowe’s, Amazon, eBay, and Lamp Doctor all stock these items.
Troubleshoot Persistent Wobble Problems
Even after tightening, issues sometimes persist. Here’s how to address common frustrations.
If the lamp still wobbles after tightening the base nut, check the insulator for cracks or brittleness. Verify that both top and bottom nuts are tight. Inspect the harp base to see if it shifted. Look for missing washers in the internal stack. If all else fails, completely disassemble and reassemble with fresh parts.
When you can’t access the base nut because the opening is too small, use long-nose pliers or a universal joint socket. Some hardware stores offer free assistance if you bring in the base. Consider partial disassembly, removing the cord to access the nut from the top.
For stripped set screws, try a slightly larger Allen key for better grip. Use a screw extractor if the head is damaged. Replace with a matching brass or stainless steel screw. Never use super glue on screws, as it fails under heat and stress.
Use epoxy only on non-electrical parts. JB Weld works well for cracked metal poles, broken base attachments, and loose threaded rods as a last resort. Let it cure for 24 hours before using the lamp. Never epoxy near wiring or sockets.
Prevent Future Looseness
A one-time fix isn’t enough if you want lasting stability. Build simple habits to prevent recurrence.
Check lamp tightness every 6 to 12 months, especially after moving the lamp or cleaning it. Inspect the base nut, socket shell, harp nut, and hinge screws annually. This takes minutes but catches problems before they become serious.
Avoid over-tightening. Snug is sufficient. Torque isn’t strength in lamp repair. Over-tightening strips plastic threads or cracks ceramic. Use hand-tight plus a quarter turn with tools.
Handle shades properly. Always hold the socket when removing or installing a shade. Never twist the harp because it transfers torque to the base. Use the switch as an anchor point when tightening the cap.
Inspect cords regularly for fraying, crushing, or non-polarized plugs. Replace damaged cords immediately. A damaged cord increases fire risk far more than a wobbly base ever could.
When to Call a Professional
Some lamps aren’t suitable for DIY repair. Seek expert help if the lamp is valuable or antique, if you’re uncomfortable working with wiring, if the internal structure is cracked, or if multiple parts are missing or broken.
Lamp repair specialists can rebuild, rewire, and restore lamps safely. Many hardware stores assist with simple repairs for free if you bring in the base or old parts for comparison.
Key Takeaways for Tightening a Loose Lamp

Fixing a wobbly lamp comes down to identifying the exact source of movement and applying the right fix to that specific component. Start with the simplest solutions: tighten the base nut first, since most wobble originates there. Move to the socket and harp only if the base is solid. For adjustable lamps, access the internal friction hinge when the arm won’t stay in position. Replace worn parts like plastic necks, stripped threads, and cracked sockets rather than trying to repair them. Protect finishes by wrapping tools in tape, and always unplug the lamp before any repair. With the right approach, tightening a loose lamp takes minutes, not hours, giving you steady, safe lighting for years to come.
Frequently Asked Questions About Tightening a Loose Lamp
Why does my lamp still wobble after I’ve tightened everything?
The most common causes are a cracked or brittle insulator inside the socket, stripped threads on the nut or rod, or a harp base that shifted during reassembly. Missing washers in the internal stack can also cause persistent wobble. Try completely disassembling the lamp and inspecting all components for damage or wear.
Where can I buy replacement lamp parts?
Replacement parts are available at Home Depot, Lowe’s, and Walmart in the hardware department. Online retailers like Amazon and eBay offer wide selections. Specialty shops like Lamp Doctor and Lighting New York carry hard-to-find components. When possible, bring the old part to the store for exact size matching.
What is the proper way to wire a lamp socket?
Cut the power cord above the old socket and strip half an inch of insulation. Attach the smooth wire to the brass screw (the hot side) and the ribbed wire to the silver or nickel screw (the neutral side). Always tie a UL knot inside the base to prevent pull-through. This prevents electrical shock and ensures proper polarity.
Can I use glue or epoxy on my lamp?
You can use epoxy only on non-electrical, non-structural parts. JB Weld works well for cracked metal poles or broken base attachments because it’s heat-resistant. Never use glue or epoxy near wiring, sockets, or any electrical components. Never glue parts that need to be removed later for maintenance.
Should I hire a professional to fix my lamp?
Consider professional help if the lamp is valuable or antique, if you’re uncomfortable working with electrical wiring, if the internal structure is cracked, or if multiple parts are broken. Lamp repair specialists have the tools and expertise to fix complex issues safely. Many hardware stores also offer free assistance for simple repairs.



