
If you’re wondering how to connect a fluorescent lamp safely and effectively, you’re not alone. Whether replacing an old fixture, upgrading from incandescent lighting, or troubleshooting a flickering tube, understanding the wiring, components, and safety steps is essential. Fluorescent lamps rely on a precise electrical system involving a ballast, starter in older models, sockets, and proper grounding to produce light efficiently. Unlike simple bulb swaps, connecting a fluorescent lamp requires attention to component compatibility, correct wiring, and electrical safety.
This guide walks you through every step, from identifying parts and turning off power to making secure connections and testing your setup. You will learn how to install or replace a fluorescent fixture, wire a ballast correctly, and avoid common mistakes that lead to flickering, buzzing, or electrical hazards.
Essential Components of a Fluorescent System
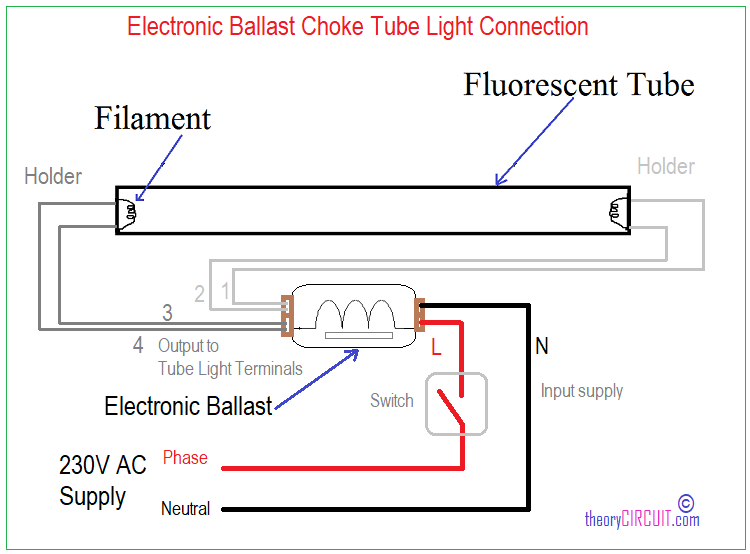
Before connecting a fluorescent lamp, you need to understand the key components that make it work. Each part plays a specific role in starting and maintaining the light.
Fluorescent Tube Types: T8, T5, and T12
The tube is the visible glass component that emits light. Inside, mercury vapor and a phosphor coating convert UV light into visible illumination. Tubes come in standardized sizes:
• T12: 1.5-inch diameter, older and less efficient
• T8: 1-inch diameter, common in homes and offices
• T5: 5/8-inch diameter, modern and high-efficiency
Key Rule: Always match the tube type to the ballast. A T8 tube will not work properly on a T12-only ballast.
Ballast Types: Magnetic vs Electronic
The ballast regulates current and provides the high voltage needed to start the lamp. Two main types exist:
• Magnetic ballasts: Older, heavier, and noisier; require a starter
• Electronic ballasts: Modern, efficient, silent; no starter needed
Electronic ballasts improve energy efficiency by 20 to 30 percent and eliminate flicker and hum.
Starter Function in Magnetic Systems
Used only with magnetic ballasts, the starter briefly heats the tube filaments before cutting off to trigger a voltage surge from the ballast. If your fixture has a small cylindrical component near the tube, it is likely a starter.
Note: Electronic ballasts do not use starters. They handle preheating internally.
Safety First: Power Off and Verify
:max_bytes(150000):strip_icc()/Top-electrical-testers-11522571-v1-f9cdf41a3e854bbfa684f2a86461dcd7.png)
Skipping safety steps is the leading cause of electrical accidents during fluorescent lamp installation.
Turning Off Power at the Breaker
Never rely on a wall switch alone. Go to your electrical panel and turn off the circuit powering the fixture. Use a lockout or tagout device in shared spaces to prevent accidental re-energizing.
Testing for Live Wires
Use a non-contact voltage tester to confirm the power is off:
• Touch it to the black hot wire
• Check the white neutral and ground wires
• Test inside the fixture and at the switch
If the tester beeps or lights up, do not proceed.
Wearing Proper Safety Gear
• Insulated gloves and safety glasses protect against shocks and broken glass
• Use insulated tools to minimize risk
Pro Tip: Even if the light is off, always assume wires are live until tested.
Tools and Materials You Will Need
Gather everything before starting to avoid delays mid-job.
Basic Tools Required
• Screwdriver (Phillips and flathead)
• Wire stripper (adjustable for 14 to 12 AWG)
• Wire nuts (red or yellow size for 2 to 3 wires)
• Electrical tape
• Non-contact voltage tester
• Ladder (for ceiling fixtures)
Components Needed
• Fluorescent fixture (or replacement parts)
• Correct tube type (T8, T5, or T12)
• Compatible ballast (if replacing)
• Starter (only for magnetic systems)
• Mounting hardware
Step-by-Step: Installing a Fluorescent Fixture
Follow these steps to connect a fluorescent lamp safely and correctly.
Removing an Old Fixture
- Turn off power and verify with tester.
- Remove diffuser and tubes.
- Unscrew the fixture cover to access wiring.
- Disconnect the black hot wire, white neutral wire, and green or bare ground wire.
- Unscrew mounting bracket and lower fixture.
Caution: Older fixtures may have heavy magnetic ballasts. Support the weight during removal.
Mounting the New Fixture
- Attach the mounting bracket to the ceiling box or joist.
- Use number 8 or number 10 screws for stability.
- Ensure the bracket is level and secure.
Best Practice: Mount directly into a joist for heavy multi-lamp fixtures.
Connecting Power Wires to Ballast
Match wire colors carefully:
• Black (house hot) to Black (ballast line)
• White (house neutral) to White (ballast neutral)
• Green or bare (ground) to Fixture grounding screw
Secure with wire nuts and wrap with electrical tape.
Warning: Reversing hot and neutral creates a shock hazard, even when the switch is off.
Wiring Ballast to Sockets
Use the ballast printed diagram as your guide. For a typical two-lamp electronic ballast:
One End of Each Tube
• Red wires connect to one terminal on each socket (same end)
Opposite End of Each Tube
• Blue wires connect to the other terminal on each socket
Shared Connection (If Applicable)
• Yellow wire connects to jumper between sockets or common terminal
Critical: Do not swap red and blue wires. Each pair powers one side of the tube filament.
Reinstalling Sockets and Cover
- Snap sockets back into place.
- Ensure no wires are pinched.
- Reattach the fixture cover.
- Reinsert tubes.
Installing the Fluorescent Tube Correctly

Now that the fixture is wired, it is time to install the lamp.
Aligning and Inserting the Tube
- Hold the tube at a 45-degree angle.
- Insert pins into both sockets.
- rotate 90 to 180 degrees until the tube clicks and locks.
Tip: Avoid touching tube pins with bare fingers. Skin oils can reduce conductivity and shorten tube life.
Checking for Secure Fit
Give the tube a gentle tug. It should not come loose. If it wobbles, rotate it back and reseat.
Restoring Power and Testing the Light
The final step is testing your work.
Turning On the Circuit
- Flip the breaker back on.
- Toggle the wall switch.
Observing Operation
• Electronic ballast: Lights should turn on instantly or within 1 second.
• Magnetic ballast: May flicker briefly before stabilizing.
Good Signs:
• Even brightness
• No buzzing
• No flickering after startup
Bad Signs:
• No light
• One end glowing
• Persistent flicker
Troubleshooting Tip: If the light does not work, double-check all wire connections and tube seating.
Common Wiring Mistakes to Avoid
Even small errors can cause big problems. Here is what to watch for.
Reversed Hot and Neutral
Connecting white to black and vice versa means the fixture remains energized even when off, creating a shock risk when changing tubes.
Fix: Black to black, white to white, every time.
Loose Wire Nuts
A loose connection can arc, overheat, and cause a fire.
Prevention: Twist wires together before capping, then tug-test each connection.
Wrong Ballast-Tube Match
Using a T12 ballast with T8 tubes causes poor starting and reduced lifespan.
Rule: Match ballast specifications exactly to tube type and wattage.
Skipping the Ground
Never leave the ground wire unconnected. It protects against shocks if a live wire touches the metal housing.
Action: Always bond the green or bare wire to the fixture grounding screw.
Troubleshooting: No Light or Flickering
If your fluorescent lamp is not working, diagnose step by step.
No Light at All
Possible Causes:
• Power not restored
• Loose wiring
• Bad ballast
• Failed tube or starter
Solution:
- Verify power with a tester.
- Reseat the tube.
- Replace the starter (if applicable).
- Test with a new tube.
- If still dead, replace the ballast.
Flickering or Flashing
Common Causes:
• Worn tube
• Failing starter
• Loose connections
Fix:
• Replace the tube first.
• If flickering continues, replace the starter (magnetic systems).
• Check wire nuts for tightness.
Buzzing or Hum
• Magnetic ballasts hum slightly. This is normal.
• Loud buzzing indicates a failing ballast.
• Solution: Upgrade to an electronic ballast for silent operation.
One End Glows But Tube Will Not Start
This usually means one filament is burned out, a bad connection exists on one side, or the ballast output is miswired.
Action: Replace the tube. If problem persists, check red and blue wire connections.
When to Replace the Ballast
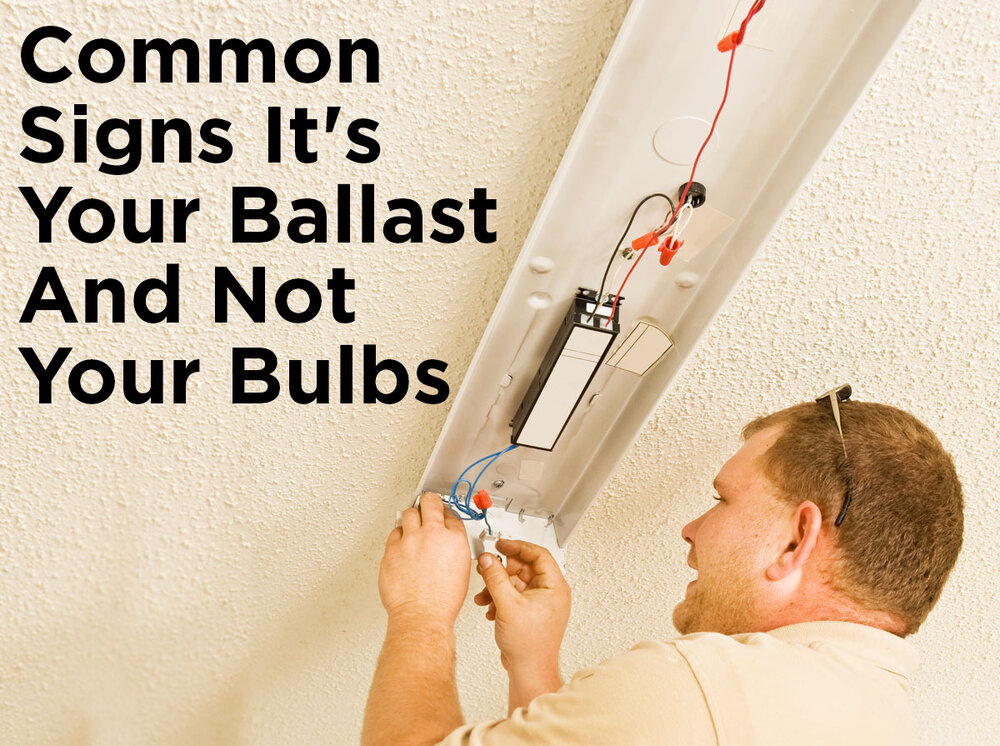
Ballasts last 10 to 15 years, but signs of failure include:
• Persistent flickering
• Loud buzzing
• Burning smell
• Tar-like ooze from the case
Ballast Replacement Steps
- Turn off power and verify.
- Remove tubes and cover.
- Label each wire before disconnecting.
- Disconnect old ballast.
- Connect new ballast one wire at a time, following the diagram.
- Secure with mounting screw.
- Reassemble and test.
Pro Tip: The ballast is the least likely part to fail. Replace tubes and starters first.
Upgrade to LED: A Smart Alternative
Consider converting your fluorescent fixture to LED for better efficiency.
Benefits of LED Retrofit
• 50 percent less energy than fluorescent
• 50,000-plus hour lifespan (vs. 20,000 max for fluorescent)
• No ballast or starter needed (in bypass kits)
• Instant on, no flicker
Two Retrofit Options
-
Plug-and-Play LED Tubes: Use existing ballast. Easy install, just replace tubes. But if ballast fails, light goes out.
-
Ballast-Bypass (Direct Wire): Remove ballast and wire power directly to sockets. More reliable long-term.
Warning: Bypassing the ballast requires rewiring. Follow kit instructions precisely.
Maintenance Tips for Long Life
Keep your fluorescent lamp performing well with simple care.
Cleaning Fixtures Every 6 Months
Dust blocks up to 30 percent of light output.
Steps:
- Turn off power.
- Remove diffuser and tubes.
- Wipe tubes with a dry cloth.
- Clean reflector with microfiber.
Inspecting Wiring Annually
Check for:
• Loose wire nuts
• Corrosion
• Brittle insulation
Tighten or replace as needed.
Replacing Tubes in Pairs
In two-tube fixtures, replace both tubes together. A new tube paired with an old one will flicker and wear out faster.
Final Checks Before Use
Before declaring the job done, verify these points.
Confirm All Connections Are Tight
Loose wires cause flickering and overheating. Tug-test each wire nut.
Ensure Grounding Is Connected
The green or bare wire must be screwed to the metal frame.
Verify Tube Is Locked In
A poorly seated tube will not light. Rotate until it clicks.
Test with Wall Switch
Make sure the switch controls the light, not the breaker.
Frequently Asked Questions About Connecting a Fluorescent Lamp
Can I replace a T12 fluorescent tube with a T8 tube?
You can only replace T12 with T8 if your ballast is compatible. T8 tubes require a T8-specific or universal ballast. Using a T12-only ballast with T8 tubes causes poor starting and reduced lifespan.
Why does my fluorescent lamp flicker when it starts?
Flickering during startup usually indicates a worn tube, failing starter (in magnetic systems), or loose wire connection. Try replacing the tube first. If flickering persists with a magnetic ballast, replace the starter.
Do electronic ballasts need a starter?
No. Electronic ballasts handle filament preheating internally and do not require a separate starter. If your fixture has a starter, it likely has a magnetic ballast that could benefit from an upgrade.
How do I know if the ballast is bad?
Signs of a failing ballast include loud buzzing, persistent flickering despite new tubes, a burning smell, or tar-like ooze from the case. Replace the ballast if other components test as good.
Can I convert my fluorescent fixture to LED?
Yes. You can use plug-and-play LED tubes that work with your existing ballast, or install a ballast-bypass kit that requires rewiring. Both options provide better energy efficiency and longer lifespan.
Is it dangerous to connect a fluorescent lamp without grounding?
Yes. Skipping the ground connection creates a shock hazard if a live wire contacts the metal housing. Always connect the green or bare ground wire to the fixture grounding screw.
Key Takeaways for Connecting Your Fluorescent Lamp
Connecting a fluorescent lamp is a manageable DIY task when done safely and correctly. Always turn off power at the breaker and verify with a voltage tester before starting any work. Match your tube type (T5, T8, or T12) to the correct ballast, and follow the ballast wiring diagram precisely when connecting red, blue, and yellow output wires to the sockets. Secure all connections with wire nuts, wrap with electrical tape, and always connect the ground wire to prevent shock hazards.
For long-term savings and reliability, consider upgrading to LED retrofit tubes or a ballast-bypass kit. LED options use 50 percent less energy and last over 50,000 hours compared to the 20,000-hour maximum of fluorescent tubes. If you are ever unsure about any electrical work, consult a licensed electrician. Your safety is worth the investment.



