
Your projector flashes “Replace Lamp” even after installing a brand-new bulb. This frustrating scenario happens constantly, and the solution is simpler than you might think. Most projectors don’t automatically detect lamp replacements—the internal hour counter keeps running unless you manually reset it. This guide covers every major brand, from Epson and NEC to BenQ and Optoma, with step-by-step instructions, troubleshooting tips, and safety practices to get your projector running like new in under a minute.
You’ll learn exactly when to reset, which method works for your specific model, how to troubleshoot common issues, and critical safety precautions to follow. Whether you’re dealing with persistent warnings, startup failures, or just want accurate usage tracking, this comprehensive guide has you covered.
Why Reset Projector Lamp Timer After Replacement
Eliminate Persistent “Replace Lamp” Warnings
After swapping your projector’s lamp, the “Replace Lamp” or “Lamp Life End” message often persists. This isn’t a malfunction—the projector timer still counts past the old lamp’s lifespan. Resetting clears the warning instantly. Without this step, the alert reappears every time you power on, even with a brand-new lamp installed.
Prevent Startup Failure on Strict Models
Some projectors enforce hard shutdowns at specific hour thresholds. NEC models like the LT220 or LT260 refuse to power on once the timer exceeds 1600 hours. This safety feature prevents operation of potentially dangerous, degraded lamps. Resetting the timer restores functionality and ensures reliable startup.
Maintain Accurate Usage Tracking
The lamp hour counter tracks total runtime for maintenance planning. If not reset, it continues counting from the old lamp’s hours, making it impossible to monitor the new lamp’s true lifespan. Accurate tracking helps you anticipate future replacements and avoid mid-presentation failures.
When to Reset Projector Lamp Timer
Always Reset After Installing a New Lamp
Reset the timer every time you replace the bulb. This syncs the projector’s software with the physical hardware update. Skipping this step defeats the purpose of the replacement—your projector still thinks it’s running on a worn-out lamp.
Never Reset Without Physical Replacement
Avoid resetting if the lamp hasn’t been changed. While the counter drops to zero, the actual lamp remains degraded. You risk sudden failure, dim output, or even bulb explosion in older units. The timer is a maintenance tool, not a workaround for extending unsafe usage.
Reset Required If Projector Won’t Turn On
If your projector powers off immediately or won’t start after a lamp swap, the timer likely exceeded a hard cutoff. Models like NEC require a secret reset method to regain access. Once powered, replace the lamp if it’s near or past its rated life.
Universal Reset Method for Most Brands
This process works for Epson, Sony, Panasonic, BenQ, ViewSonic, Acer, and many other manufacturers. Always ensure the lamp compartment is securely closed before starting.
Access the On-Screen Menu
Power on the projector and press the Menu button on the remote or control panel. Wait for the full image to stabilize, as some models disable menu access during startup.
Navigate to Reset or System Menu
Use arrow keys to find one of these options:
- Reset
- System Setup
- Maintenance
- Settings
Exact labels vary by brand, but the section typically groups with setup or service functions.
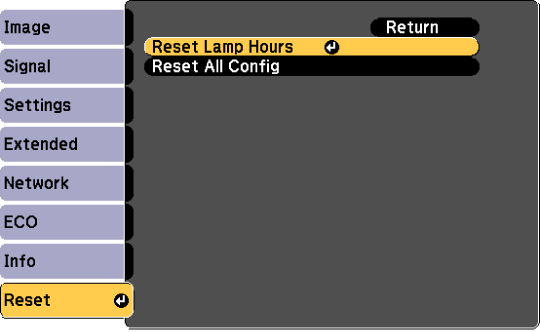
Select Reset Lamp Hours
Look for any of these options:
- Reset Lamp Hours
- Lamp Reset
- Clear Lamp Timer
- Reset Runtime
Select the option and confirm when prompted with “Do you want to reset the lamp hours?” Choose Yes, then press Enter.
Verify Reset Success
Exit the menu and press the Info button on your remote. The display should show “Lamp Life: 0 Hours” or “Lamp Time: 0000.” If the count remains high, repeat the steps or try an alternative method.
Button-Hold Reset for Specific Models
Some projectors skip the menu system entirely and use a direct button combination. This method is common on BenQ, Optoma, ViewSonic, InFocus, and Acer models.
Standard Button-Hold Procedure
- Power on the projector
- Press and hold the Enter (OK) button on the remote or keypad
- Hold for 3 to 5 seconds until a message appears showing “Lamp Run Time Reset” or “Lamp Timer Reset Successfully”
- Release the button
- Wait for the projector to return to normal operation
No confirmation prompt usually appears. Success is indicated by the on-screen message.
Model-Specific Reset Procedures
NEC Projectors (LT220, LT240, LT260)
Check Lamp Hours First
- Press Menu
- Go to Information
- Scroll to Page 3
- View Lamp Hour Meter for exact usage
At 1500 hours, a “Replace Lamp” warning appears. At 1600 hours, the projector refuses to start unless the timer is reset.
Standard Reset (Before 1600 Hours)
- Turn on projector
- Press Menu, then go to Projector Options, then Setup
- Go to Page 4
- Select Clear Lamp Hour Meter
- Confirm with OK
Secret Reset (After 1600 Hours)
If the projector won’t power on:
- Use the original remote control
- Press and hold the Help button for 10 or more seconds
- The lamp clock resets to zero
- Unit should now start
This is a failsafe. The lamp may still be unsafe, so replace immediately.
InFocus Projectors
Manuals often omit reset instructions, but a universal method works:
- Ensure projector is plugged in (standby power acceptable)
- Locate Brightness Up and Brightness Down buttons on the unit
- Press and hold both buttons for 10 seconds
- Release when timer resets
- Power on normally
If unresponsive, try in standby mode or with power cycled.
BenQ Projectors (MH530, HT2050, W1100)
- Install new lamp and close cover securely
- Power on projector
- Open Menu
- Navigate to System Setup or Lamp section
- Choose Reset Lamp Timer or Lamp Reset
- Confirm to reset
Note that the path varies by model. Consult BenQ video guides if the option is missing.
Automatic Reset via Microchip Technology
Some high-end projectors automatically reset the lamp timer using smart technology.
How Auto-Reset Works
OEM replacement lamps include a green microchip or RFID tag. The projector detects the chip at startup and resets the timer automatically to zero hours. No user action is required.
Brands Supporting Auto-Reset
- Sony (select VPL series)
- Panasonic (PT series with Lamp ID)
- Epson (certain PowerLite models)
- Barco (professional units)
Third-party lamps without chips won’t trigger auto-reset. You must manually reset the timer or face persistent warnings.
Troubleshooting Common Reset Issues

Replace Lamp Message Won’t Clear
The timer wasn’t reset after replacement. Perform manual reset via menu or button-hold method. If unsuccessful, check if the projector is in demo mode.
No Reset Option in Menu
Demo mode or admin lock is enabled. Exit demo mode (often via System, Mode, Normal). Commercial models may require an admin password to unlock service menus.
Reset Option Grayed Out
The projector doesn’t recognize the lamp, which is common with third-party bulbs. Try a chipped OEM lamp or use the button-hold method. Some models block resets unless a genuine part is detected.
Projector Shuts Down After Reset
Overheating or loose lamp seating is likely. Power off, unplug for 2 minutes, and reseat the lamp. Ensure air filters are clean, as dust buildup triggers thermal shutdowns.
Timer Resets But Warning Returns
A system cache glitch may be the culprit. Perform a full power cycle by unplugging for 2 minutes, then restarting. If the issue persists, consider a factory reset after backing up settings first.
Projector Lamp Status Indicators Explained

Status Light Meanings
A solid red light means the lamp has reached end-of-life. Replace immediately and reset the timer. Ignoring this risks sudden failure or bulb rupture.
A flashing red light indicates lamp failure or overheating. Inspect for proper seating, clean filters, and ensure ventilation. Replace if the lamp is dim or flickering.
A yellow or orange light means the lamp is nearing end-of-life, typically over 90% used. Prepare for replacement but continue use if image quality is acceptable.
On-Screen Messages
Messages like “Lamp Life End” or “Check Lamp” appear at 90 to 100% usage. Only reset after physical replacement.
Checking Runtime Display
Press the Info button to view current lamp hours. Found in the Status or Information menu. Use this to track usage and plan replacements.
Projector Lamp Maintenance Best Practices
Clean Filters Regularly
Dust clogs air intake, causing overheating and shortening lamp life. Use compressed air or a soft brush every 50 to 100 hours, depending on your environment.
Use Eco Mode When Possible
Eco mode reduces brightness by 10 to 20% but can extend lamp life by 50% or more. Ideal for well-lit rooms or prolonged use.
Allow Proper Cooldown Time
Never unplug or move the projector immediately after use. Allow 2 to 5 minutes of cooldown. Thermal stress from sudden cooling increases failure risk.
Handle Lamps with Gloves
Skin oils leave residue on the bulb glass. When heated, this creates hot spots that can cause cracks or explosions. Always wear lint-free gloves when handling lamps.
Dispose of Old Lamps Properly
Most projector lamps contain mercury and are hazardous waste. Return to the manufacturer, retailer, or certified e-waste facility.
Record Installation Details
Note the replacement date and initial runtime. This helps track lifespan, identify usage patterns, and plan future maintenance.
Critical Safety Warnings
Always Power Off Before Replacement
Always unplug the projector before opening the lamp compartment. Capacitors can retain dangerous voltage even when the unit is off.
Never Look Into the Lens When Powered
The intense light can cause permanent eye damage. Never stare into the beam, especially at close range.
Old Lamps Pose Safety Risks
Lamps beyond 1600 to 2000 hours are more prone to explosion. NEC’s hard cutoff exists for this reason. Replace the lamp rather than resetting and ignoring the warning.
Use Genuine or Certified Lamps
Third-party lamps may lack safety certifications or proper thermal design. Stick to OEM or reputable OEM-equivalent brands.
Ensure Lamp Door Is Fully Closed
An open or misaligned panel triggers safety sensors. The projector may refuse to start or display errors. Double-check the latch before powering on.
Why Manual Reset Is Required
Manufacturers require manual resets for several important reasons. First, it prevents extended use of degraded lamps that could fail unexpectedly. Second, it reduces liability from bulb failures or explosions. Third, it encourages genuine part purchases rather than allowing users to bypass safety features. Fourth, it maintains diagnostic accuracy for service technicians. Fifth, it ensures user accountability in maintenance scheduling.
Auto-reset could allow users to bypass safety warnings entirely. Manual action confirms the user has physically replaced the lamp.
Step-by-Step Reset Checklist
1. Replace the Lamp Safely
Power off and unplug the projector. Wear gloves. Install the new lamp carefully. Securely close the compartment.
2. Power On and Stabilize
Wait for full startup and image display. Some models disable reset during boot.
3. Access the Menu
Use the remote or control panel to open the on-screen interface.
4. Navigate to Reset Option
Find Reset Lamp Hours, Lamp Reset, or equivalent under System or Maintenance.
5. Confirm the Reset
Select Yes when prompted. The timer should drop to zero.
6. Verify Success
Press Info to confirm “Lamp Life: 0 Hours.”
Alternative Methods Summary
- Hold Enter for 3 to 5 seconds on BenQ, Optoma
- Hold Help for 10 or more seconds on NEC post-1600h models
- Hold Brightness Up and Down simultaneously for 10 seconds on InFocus
- Auto-reset requires no action if using chipped OEM lamps
Frequently Asked Questions About Resetting Projector Lamp Timers
How do I reset my projector lamp timer after replacing the bulb?
Power on the projector and access the Menu button. Navigate to Reset, System Setup, or Maintenance. Look for “Reset Lamp Hours,” “Lamp Reset,” or “Clear Lamp Timer.” Select it, confirm with Yes, and verify success by pressing the Info button to see “Lamp Life: 0 Hours.”
Why does my projector still say Replace Lamp after installing a new bulb?
The projector lamp timer wasn’t reset after replacement. The internal hour counter continues from the old lamp’s usage. Perform the manual reset via the menu system or button-hold method to clear the warning.
What happens if I don’t reset the projector lamp timer?
Without resetting, the “Replace Lamp” warning persists indefinitely. Some models like NEC projectors will refuse to power on once the timer exceeds 1600 hours. Usage tracking becomes inaccurate, making it impossible to plan future replacements.
Can I reset the lamp timer without replacing the lamp?
Technically yes, the counter will reset to zero. However, this is dangerous. The lamp remains degraded, dim, and at risk of sudden failure or explosion. Never reset without physically replacing the lamp, especially if it’s past its rated life.
Why is the reset option grayed out in my projector menu?
The projector likely doesn’t recognize the lamp, which is common with third-party bulbs. Try using a genuine OEM lamp with a microchip or use the button-hold reset method instead. Commercial models may also require an admin password.
Do all projectors require manual lamp timer reset?
Most projectors require manual reset, but some high-end models with chipped OEM lamps auto-reset automatically. This feature is available on select Sony, Panasonic, Epson, and Barco projectors. Third-party lamps won’t trigger auto-reset.
Final Thoughts on Resetting Your Projector Lamp Timer
Resetting your projector lamp timer is an essential maintenance task that clears warnings, prevents startup issues, and ensures accurate usage tracking. Always reset immediately after replacing the lamp, verify success via the Info menu, and use genuine or certified lamps when possible. Follow safety practices including powering off before replacement, wearing gloves, and allowing proper cooldown time. With this guide, you can handle any reset scenario across major brands like Epson, NEC, BenQ, Optoma, and InFocus—no technical expertise required.



