
Is your lamp flickering, failing to turn on, or acting up every time you touch the switch? A faulty lamp switch is often the culprit, and replacing it is one of the easiest, most cost-effective DIY repairs you can do. Whether it is a pull-chain socket switch or an in-line rocker on the cord, this guide shows you exactly how to replace a lamp switch safely and correctly.
With just a few basic tools and about 30 minutes, you can restore full functionality to your favorite table or floor lamp. No need to buy a new one. You will learn how to identify your switch type, match the replacement, wire it properly, and reassemble everything securely while avoiding dangerous mistakes like reversed polarity or exposed wires.
Identify Your Lamp Switch Type
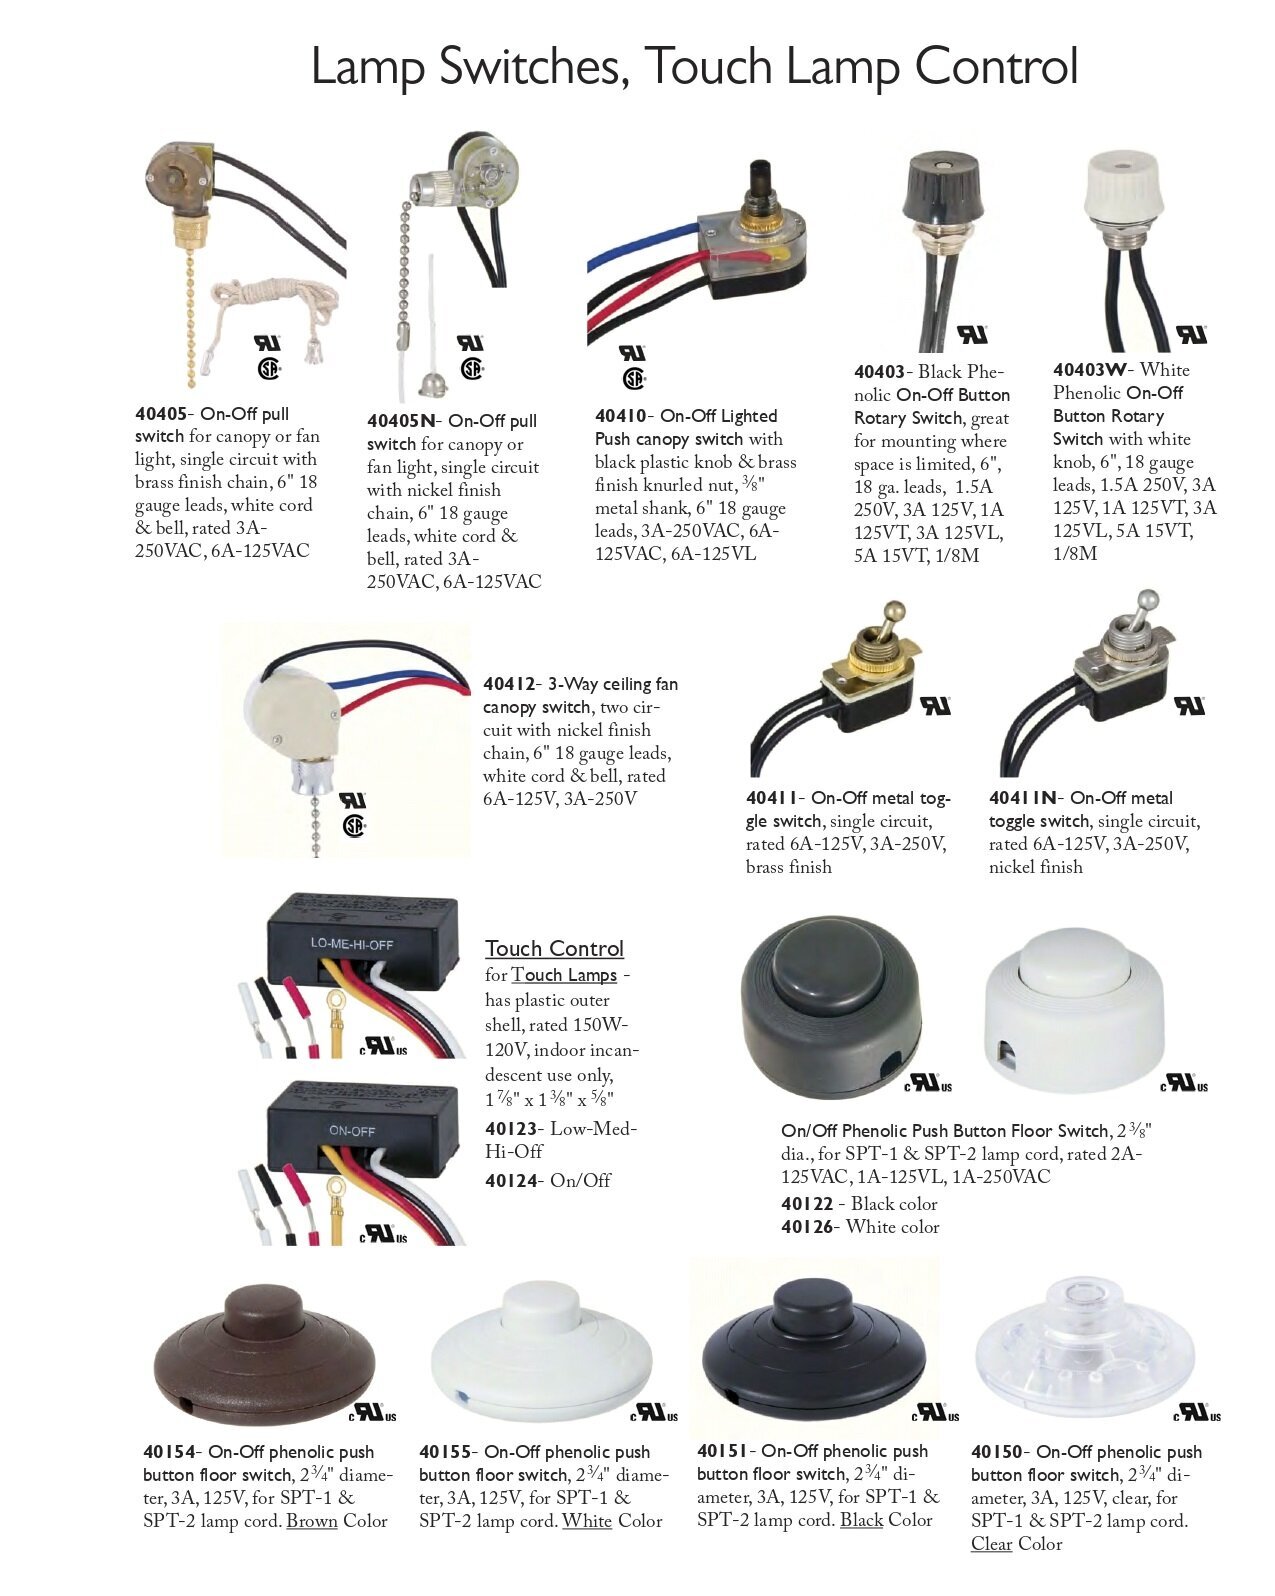
Before buying a replacement, determine what kind of switch your lamp uses. The two main types are socket-mounted and cord-mounted, and each requires a different replacement approach.
Socket-Integrated Switches
These switches are built directly into the bulb socket and are activated by a pull-chain, push-button, or rotary knob. Common types include:
• Pull-chain switch: Most common in traditional lamps; chain extends from the side of the socket
• Push-button switch: Activated by pressing the top center of the socket
• Rotary switch: A small dial on the socket body that turns to cycle power or brightness
• Three-way switch: Works with three-way bulbs to offer low, medium, and high light levels
Replacing these requires swapping the entire socket assembly, not just the switch mechanism.
In-Line Cord Switches
Located along the power cord, these switches are easier to replace because you do not need to disassemble the lamp base.
• Rocker switch: Small toggle on the cord
• Slider switch: Push-button that slides up or down
• Foot pedal switch: Found near the plug, common in floor or task lamps
Bring the old switch or socket to the store for an exact match if you are unsure what to buy.
Gather the Right Tools and Replacement Parts
You do not need advanced tools. Just a few basics and the correct replacement part will get the job done.
Essential Tools
• Phillips-head screwdriver
• Flathead screwdriver
• Needle-nose pliers
• Wire cutters and strippers
• Non-contact voltage tester (recommended)
Replacement Components
• New lamp socket (for socket switches) or in-line switch
• UL-listed, 125V, 6A-rated (standard for household lamps)
• Match wire gauge: 18 AWG or 16 AWG
Optional but helpful items include a multimeter for testing continuity, electrical tape for extra insulation, and a magnifying glass to identify wire polarity.
Home Depot, Lowe’s, Ace Hardware, or online retailers sell basic sockets for $2 to $5 and in-line switches for $3 to $15.
Prepare the Lamp Safely
Never skip this step. Even if the lamp is off, it can still carry current and pose a shock risk.
Safety First
• Unplug the lamp from the wall
• Remove the bulb, shade, harp, and finial
• Let the socket cool completely if the lamp was recently on
• Work in a dry area with dry hands
If the cord is frayed, cracked, or smells burnt, replace the entire cord instead of just the switch. Damaged insulation is a fire hazard.
Replace a Socket with Built-In Switch
Most socket switches require replacing the entire socket unit. Follow these steps to do it right.
Remove the Old Socket Assembly
- Squeeze and lift the outer shell of the socket. It may snap or unscrew from the base
- If stuck, gently pry with a flathead screwdriver, but do not force it
- Push the wires up through the lamp stem to create slack
- Unscrew the socket base from the central shaft (turn counterclockwise)
- Remove the retaining nut at the bottom with needle-nose pliers if needed
- Take out the old socket and any insulator sleeve
Look for brass and silver terminal screws where the wires were connected.
Disconnect and Prepare Wires
- Loosen the terminal screws and remove the wires
- If wires are damaged, cut them 1 inch from the end
- Strip one-half inch of insulation from each wire end
- Twist the copper strands tightly to prevent fraying
Connect Wires to the New Socket
Identify polarity by running your thumbnail along the cord. The smooth side is the hot (live) wire, and the ribbed or textured side is the neutral wire.
• Hot (smooth) wire connects to the brass or gold screw
• Neutral (ribbed) wire connects to the silver screw
Wrap wires clockwise around each screw so they tighten when you secure the screw.
Tie an overhand knot in the cord just below the socket to create strain relief and prevent pulling on the terminals.
Reassemble the Socket
- Feed the wires back down through the lamp stem
- Thread the new socket base onto the central shaft
- Tighten the retaining nut at the bottom to secure it
- Reinstall the insulator sleeve if your lamp uses one
- Snap or screw the outer shell back into place. Listen for a click
Make sure the switch is positioned for easy access and does not interfere with the shade.
Replace an In-Line Cord Switch
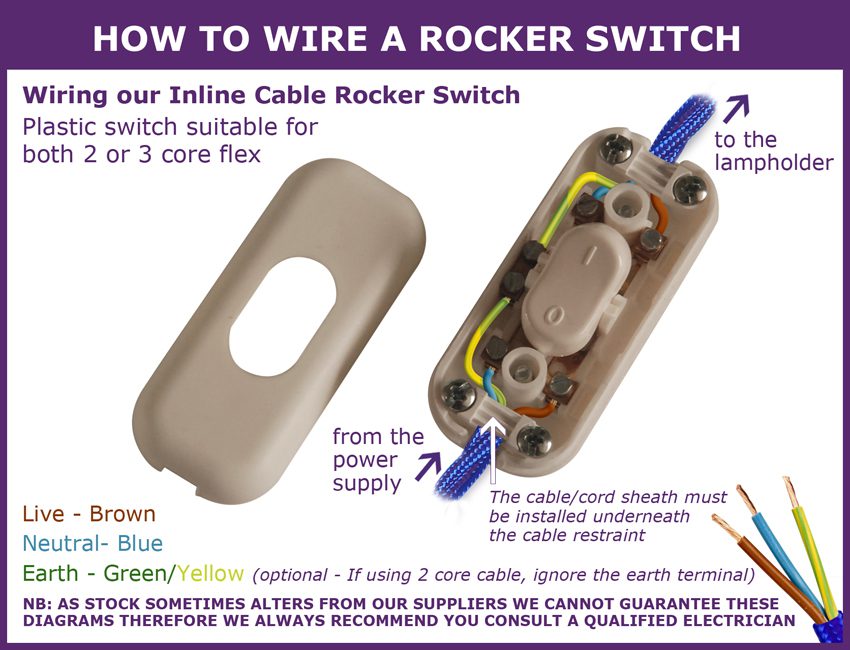
Easier than socket replacement, this method requires no disassembly of the lamp base.
Cut Out the Old Switch
- Unplug the lamp
- Locate the faulty switch on the cord
- Use wire cutters to remove the switch, leaving 4 to 6 inches of wire on each side
- Remove any decorative collar with needle-nose pliers
Prepare the Wires
- Strip one-half inch of insulation from both ends
- Identify polarity: smooth side is hot, ribbed side is neutral
Install the New In-Line Switch
- Open the switch housing
- Feed the cord into the casing
- Connect the hot (smooth) wire to the brass terminal
- Connect the neutral (ribbed) wire to the silver terminal (if present)
- Tighten screws firmly
- Ensure no bare copper is exposed when the cover closes
Some in-line switches are non-polarized and will work either way, but correct polarity improves safety.
Close the housing, reattach the collar, and wrap connections with electrical tape if desired for extra insulation.
Wire It Right: Polarity Explained
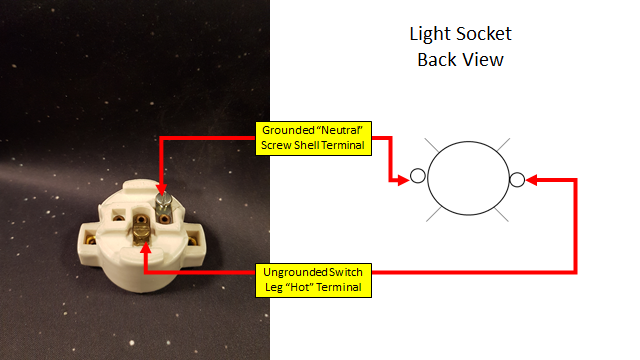
Getting the wires right is not just about function. It is about safety.
Terminal Guide
• Brass or gold screw: Accepts the hot (smooth) wire
• Silver screw: Accepts the neutral (ribbed) wire
The danger of reversed polarity is real. The threaded socket shell becomes live, increasing shock risk when changing bulbs. Even when the lamp is off, the socket may still carry current.
Modern polarized plugs have a wider neutral blade and a thinner hot blade to ensure correct orientation when plugging in.
Test Your Work
Before calling it done, verify your repair works and is safe.
Testing Steps
- Reinstall the correct-wattage bulb (do not exceed the lamp’s rating)
- Reattach the shade, harp, and finial
- Plug the lamp into a working outlet
- Turn on the switch
Success signs include the lamp turning on and off smoothly with no flickering, buzzing, or overheating. The switch should feel secure.
If it does not work, check the bulb, test the outlet with another device, re-inspect wiring connections, and use a multimeter to test switch continuity.
Fix Common Problems
Even with careful work, issues can pop up. Here is how to fix them fast.
Lamp Will Not Turn On
• Loose or incorrect wiring: Recheck both terminals
• Wrong bulb: Test with a known-good bulb
• Faulty switch: Use a multimeter to test continuity
Flickering Light
• Loose wire connection: Tighten terminal screws
• Worn socket: Replace the entire socket
Burning Smell or Heat
Stop immediately and unplug the lamp. Inspect for melted insulation or charring. Replace the entire cord if damaged.
Shock When Touching Lamp
This indicates reversed polarity or exposed wires. Correct the wiring and ensure no copper is visible.
Call a professional if the lamp has a grounding wire (3-prong plug), is antique or collectible, or has internal wiring damage.
Keep Your Lamp Running Longer
Prevent future failures with simple care.
Maintenance Tips
• Inspect annually for wear, discoloration, or loose parts
• Replace sockets early if flickering or overheating begins
• Use correct bulb wattage. Overheating kills switches
• Avoid yanking the cord to turn off the lamp
• Clean socket contacts with electrical contact cleaner if bulbs flicker
• Unplug lamps during long absences
Upgrade options include installing a dimmable switch for adjustable lighting or using LED-compatible switches for energy savings.
Final Checklist: Did You Do It Right?
Run through this verification before turning on the lamp.
• Lamp unplugged during repair
• Correct replacement switch installed
• Wires stripped and connected securely
• Hot to brass, neutral to silver
• All screws tightened
• No bare copper exposed
• Strain relief in place (knot or clamp)
• Lamp fully reassembled
• Correct-wattage bulb installed
• Test completed safely
Frequently Asked Questions About Replacing Lamp Switches
How much does it cost to replace a lamp switch?
Replacement sockets cost $2 to $5 for basic models and up to $30 to $40 for premium designs. In-line switches run $3 to $15. DIY replacement saves the cost of buying a new lamp.
Can I replace a lamp switch myself?
Yes, provided you follow safety procedures, identify wire polarity correctly, and make secure connections. No advanced tools or skills are required for this repair.
When should I replace my lamp socket?
Replace when you experience flickering or intermittent light, a burning smell or discoloration, overheating during use, difficulty inserting or securing bulbs, or visible damage to the socket or switch.
Can I change the type of switch?
Yes. You can replace a pull-chain switch with a push-button, rotary, or three-way switch as long as the new socket fits the lamp stem and shade assembly.
How do I know which wire is hot?
Run your thumbnail along the cord. The smooth side is hot, and the ribbed or textured side is neutral.
What if my lamp has no socket switch?
Some lamps use cord-mounted switches only. In these cases, replace the in-line switch instead of the socket.
Key Takeaways for Replacing Your Lamp Switch
Replacing a lamp switch is a simple, satisfying DIY job that saves money and reduces waste. Whether you are fixing a pull-chain on a bedside lamp or swapping a rocker switch on a floor lamp, the process is straightforward once you know the right steps.
With this guide, you have learned how to identify your switch type, choose the correct replacement, wire it safely with proper polarity, and reassemble and test your lamp. The critical points to remember are always unplug before working, match hot to brass and neutral to silver, and double-check that no bare copper is exposed.
You do not need to be an electrician. Just be careful, follow the steps, and verify your work. In under an hour, you will have a fully functional lamp and the confidence to tackle more electrical repairs.



