
Is your heat lamp not turning on, flickering, or hanging loose from its mount? Heat lamps fail frequently across reptile enclosures, poultry coops, ovens, and commercial kitchens, often due to simple but overlooked issues like loose screws, damaged cords, or corroded sockets. The good news? Most problems can be fixed quickly with basic tools and for under $20. This guide shows you exactly how to fix a heat lamp safely and effectively, using proven repair techniques from appliance technicians and field-tested insights. Whether it is a broken socket, a sagging bulb, or no power at all, you will learn step-by-step solutions, preventive upgrades, and how to avoid costly replacements.
Diagnose Power Issues Before Repairs
Before disassembling anything, confirm whether the problem is with the lamp, the bulb, or the power source. Many heat lamp failures stem from simple power issues that take minutes to diagnose.
Test Outlet and Plug Connection
A non-working heat lamp often stems from a dead outlet or tripped circuit. Here is what to do:
- Plug another device like a phone charger or lamp into the same outlet to check if the outlet is live
- Check your breaker panel to see if a circuit has tripped or a fuse has blown
- If using a timer or thermostat, bypass it temporarily to test direct power to the lamp
Never assume the outlet is live. Always verify with a voltage tester before proceeding. If the breaker trips when you plug in the lamp, stop immediately because you likely have a short circuit in the wiring or socket that requires full inspection.
Replace or Test the Bulb First
A burned-out bulb is the most common cause of heat lamp failure. Before replacing expensive components, rule out the bulb.
Check Filament and Blackening
Remove the bulb and inspect it closely. Look for these signs:
- Broken or sagging filament
- Glass darkened at the base, which indicates end-of-life or overheating
- Visible cracks or damage to the glass
To confirm whether the bulb is faulty, screw it into a known-working lamp. If it does not light, replace the bulb. Always match the replacement to the original specifications, including voltage (typically 120V in the US), wattage (such as 60W or 100W), and base type (typically E26 or E27 screw base).
Pro Tip: In reptile enclosures, skip expensive reptile-branded bulbs. A standard 65W flood incandescent from the hardware store works just as well and costs about $1 instead of $10.
Fix Loose or Hanging Heat Lamps
In ovens or animal enclosures, heat lamps often sag or hang due to loose or stripped screws. This creates a fire hazard and reduces heating efficiency.
Tighten or Upgrade Mounting Screws
Watch for these symptoms indicating loose mounting:
- Lamp hangs to one side or wobbles
- Bulb rattles when the fixture is touched
- Visible gap between the socket and housing
To repair, turn off power at the breaker first. Open the oven or housing to access the lamp and inspect the mounting screws. They may be missing, stripped, or too thin. Replace with coarse-threaded, thicker-diameter screws of the same length. Coarse threads grip better in worn holes, and thicker shanks resist stripping.
Hand-tighten the screws until firm. Do not over-tighten, or you will crack the porcelain socket. Once you feel resistance stop tightening. Test stability by gently tugging the lamp, then reassemble and restore power.
Prevention tip: Check screw tightness monthly during cleaning to prevent recurrence.
Repair a Damaged Power Cord

Frayed, melted, or kinked cords are fire hazards and cause intermittent operation. Address cord damage immediately.
Identify Cord Damage
Inspect the entire cord length for these warning signs:
- Discoloration with brown or black spots
- Brittleness or cracking in the insulation
- Exposed copper wires
- Pinched sections near the plug or housing
If any of these are present, replace the cord immediately. Use only cords rated for 300V with an exterior or weather-resistant jacket. The wire gauge should be 16 to 18 AWG to match most heat lamps.
Replace the Cord Step by Step
- Unplug and disassemble the lamp by removing the four screws holding the housing
- Pull the old cord through the rubber grommet and note how the wires connect
- Strip half an inch of insulation from the new cord wires
- Clean terminal screws with WD-40 to remove corrosion, then wipe dry
- Connect the black wire to the center terminal and the white wire to the outer ring terminal marked with a B
- Wrap wires clockwise around the screws so they tighten as you turn
- Feed the new cord through the grommet with the tab toward the center
- Snap the housing back together and secure all screws
- Plug in and test with a working bulb installed
This repair costs $10 to $20 versus $70 to $100 for a new lamp.
Fix a Broken Porcelain Socket Base
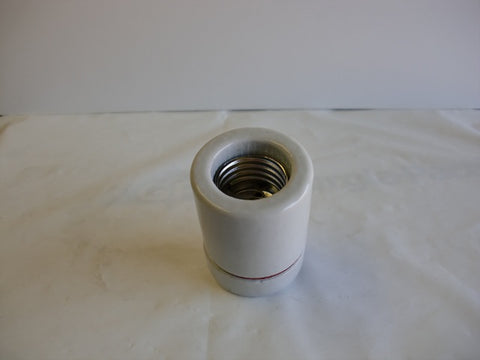
Many heat lamps fail when the porcelain base detaches due to rivet breakage, which is a common design flaw in cheaper models.
Recognize Early Failure Signs
Watch for these indicators:
- Bulb sags or drops into the enclosure
- Flickering even with a new bulb
- Rattling when the fixture is touched
- Visible gap between the base and housing
This happens because thin metal rivets fatigue under repeated bulb tightening. The tensile stress causes cracks and eventual detachment. Never ignore this because a detached bulb in a chicken coop or reptile tank can start a fire.
Reinforce with Pop Rivets and Washer
Gather these materials:
- Two stainless steel pop rivets (3/16 inch)
- Metal washer (steel or brass)
- Tin snips or Dremel tool
- Rivet gun
- Screwdriver
Cut the washer radially so it can open and wrap around the porcelain ridge. Position the washer so it does not interfere with the bulb base when fully screwed in. Realign the porcelain base into the housing, then drill or use existing holes to insert pop rivets through the base plate. Clamp with the rivet gun until fully seated.
Reconnect wiring, ensuring no pinched or strained wires. Reinstall the bulb. It should screw in smoothly with no movement. This single repair extends the lifespan from months to years.
Clean Corroded Electrical Contacts
In humid environments like bathrooms and reptile tanks, corrosion causes flickering or no power.
Clean with Contact Spray
Power off and unplug the fixture first. Disassemble to access the socket terminals. Spray WD-40 or electrical contact cleaner on the terminal screws, socket threads, and wire connection points. Wipe dry with a lint-free cloth, then reassemble and test.
Never use water or liquid cleaners near electrical components because this risks short circuits.
Replace Faulty Sockets and Fixtures
If the socket spins, buzzes, or shows burn marks, replace it rather than attempting repair.
When to Replace the Socket
Replace the socket if you notice these problems:
- Socket rotates when the bulb is tightened
- Internal wires move independently
- Visible melted plastic or burn marks
- Cracked or warped ceramic
Damaged sockets can arc and overheat, creating a fire risk even if the bulb lights. Buy a high-temperature ceramic socket rated for 250 degrees Celsius or higher. Disconnect the old socket wires and connect the new one with black to the brass screw and white to the silver screw. Secure the socket in the housing using locknuts to prevent loosening from vibration.
Reassemble a Loose Clamp Mount
Many heat lamps use a clamp to attach to stands or tables. Over time, the clamp loosens or fails.
Clamp Reassembly Guide
The clamp consists of two jaws, a rough metal plate acting as a hinge, a bolt with a wing nut, and a metal sprocket for alignment. Insert the rough metal plate into the rear of the clamp jaws. Slide the clamp over the white housing side of the lamp. Loosen the wing nut to open the clamp and insert the metal sprocket into the gap to ensure even pressure.
Place the clamp on your mounting surface and tighten the wing nut gradually. As the bolt pulls, the metal plates pinch together and compress the ceramic housing. Stop when the clamp holds firmly with no movement.
Do not over-tighten because this can strip threads or deform the metal. Inspect monthly for wear, especially in barns or workshops with vibration.
Troubleshoot Reptile Heat Lamps
Reptile enclosures add complexity with thermostats, timers, and UVB requirements.
Step-by-Step Diagnosis
If there is no heat at the basking spot, test the bulb in a household lamp first. Try a known-good bulb in the fixture. Inspect the socket to see if the threaded sleeve spins or has burn marks. Check the thermostat or timer by bypassing it to test direct power.
For a temporary fix, use a 100W incandescent bulb in a safe fixture and monitor the temperature with a digital thermometer. Avoid spot bulbs like the ProRep 60W because they are too intense and dry out reptile shells.
Choose the Right Replacement Bulb
Using the wrong bulb reduces efficiency and lifespan.
Bulb Recommendations by Application
| Use Case | Recommended Bulb |
|---|---|
| Reptile Basking | 65W flood incandescent |
| Ovens | Appliance-rated bulb (high-temp) |
| Outdoor/Patio | Damp-location rated bulb |
| Brooders | Red heat lamp (250W) |
Mercury vapor bulbs provide heat plus UVB but cost $50 to $80 and need replacement every 6 to 8 months when the UVB degrades.
Verify Performance After Repair
Do not assume the repair is complete without testing.
Measure Amp Draw
Use a clamp meter to measure the operating current. Normal draw is approximately 7.18 amps, but check your specifications. Higher draw indicates a short circuit, while lower draw suggests a poor connection or failing bulb.
Test Heat Stability
Run the lamp for 10 to 15 minutes. Use an infrared thermometer to measure surface temperature at 12 inches. Watch for flickering, arcing sounds, burning smell, or intermittent shutdown. If any occur, recheck the wiring and connections.
Prevent Future Heat Lamp Failures
Most heat lamp problems are preventable with regular maintenance.
Monthly Maintenance Checklist
- Inspect the bulb for blackening or filament damage
- Check for loose sockets or clamps
- Clean the reflector with a dry cloth
- Verify mounting stability
Upgrade Weak Designs
Avoid cheap lamps with thin metal threads, fragile rivet joints, or externally clipped cages. Look for integrated cage designs that lock inside the housing, reinforced socket mounts with thick metal or welds, silicone-insulated wires, and strain relief on the cord entry.
Many failures are due to planned obsolescence in low-cost designs. Invest in commercial-grade units for long-term reliability.
Frequently Asked Questions About Fixing Heat Lamps
Why does my heat lamp keep flickering?
Flickering is usually caused by a loose bulb, corroded electrical contacts, or a failing socket. First, try tightening the bulb. If that does not help, clean the contacts with WD-40. If flickering persists, inspect the socket for damage and replace if necessary.
Can I use a regular light bulb in a heat lamp fixture?
You can use a regular incandescent bulb of the same wattage and base type for heat production, but avoid using bulbs rated higher than the fixture allows. For reptile enclosures, standard flood incandescent bulbs work well and cost much less than specialty reptile bulbs.
How do I know if my heat lamp socket is bad?
Signs of a bad socket include the socket spinning when you tighten a bulb, visible burn marks or melted plastic, buzzing or arcing sounds, and the bulb flickering even with a new bulb. If you see any of these, replace the entire socket.
Is it safe to repair a heat lamp myself?
Yes, as long as you disconnect the power source first and verify no live current with a voltage tester. Most repairs are straightforward and involve basic tools. However, if you encounter wiring damage beyond simple cord replacement or suspect a short circuit, consult a licensed electrician.
How often should I replace heat lamp bulbs?
Heat lamp bulbs typically last 6 to 12 months depending on use. Inspect bulbs monthly for blackening or filament damage. In reptile enclosures, replace bulbs every few months even if they still work because heat output decreases over time.
What causes heat lamp cords to fray?
Heat lamp cords fray from exposure to heat, moisture, repeated bending, and mechanical stress. Using indoor-rated cords in outdoor or humid environments accelerates damage. Always use exterior-rated, weather-resistant cords rated for 300V minimum.
Key Takeaways for Fixing Your Heat Lamp
Most heat lamp failures have simple causes and affordable solutions. Start troubleshooting by checking power at the outlet, then test or replace the bulb. Loose mounting screws, damaged cords, and corroded contacts are the most common issues you can fix yourself with basic tools. Reinforcing a broken porcelain base with pop rivets extends the lamp lifespan from months to years, and replacing a damaged cord costs $10 to $20 versus $70 to $100 for a new fixture.
Regular maintenance prevents most failures. Inspect bulbs monthly, check mounting screws during cleaning, and keep spare parts on hand including bulbs, screws, and replacement cords. When purchasing new heat lamps, invest in models with integrated cage designs and reinforced socket mounts to avoid planned obsolescence. By following these steps, you will keep your heat lamp running safely and efficiently for years to come.



