You just bought a UV or LED nail lamp and want flawless, long-lasting gel nails at home, but if you are not curing properly, your manicure could chip, peel, or wrinkle within days. Knowing how to use a UV nail lamp the right way makes all the difference between a salon-quality finish and a sticky, uneven mess. This guide walks you through every step, from prep to polish removal, so you can achieve durable, glossy results in minutes.
Whether you are using a UV, LED, or hybrid lamp, the key lies in correct technique, hand positioning, and timing. Let us break down exactly how to use a UV nail lamp safely and effectively for perfect gel nails every time.
Choose the Right Nail Lamp for Your Needs
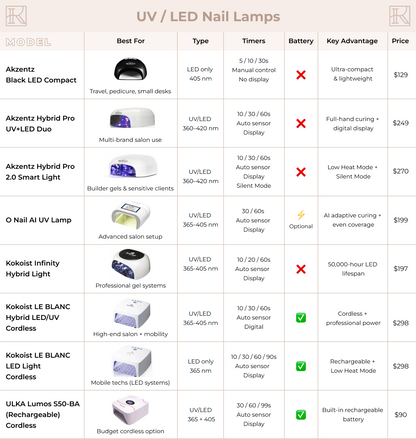
Before diving into application, ensure your device supports your gel products and delivers even curing. The right lamp makes a significant difference in your final results.
UV vs LED vs Hybrid: Understanding the Differences
UV lamps use traditional ultraviolet bulbs and typically require 2 minutes per coat to cure gel polish. They generate more heat and are slower than modern alternatives. LED lamps cure gel polish in 30 to 60 seconds and last significantly longer, making them the preferred choice for most home users. Hybrid lamps support both technologies, offering maximum flexibility if you switch between different gel brands.
Pro Tip: Opt for a 48-watt LED or hybrid lamp with multiple bulbs for faster, uniform curing across all nails.
Essential Features to Look For
When selecting your lamp, prioritize these functional elements that improve the overall user experience:
- Smart sensor technology that turns the lamp on automatically when hands are inserted
- Dual-hand capacity design that saves time by curing both hands simultaneously
- Removable base for easier cleaning and perfect pedicure use
- Pre-set timer settings matching most common gel brand specifications
- UV-protective cover to reduce light exposure when the lamp is not in use
Always verify that your lamp is compatible with your specific gel polish brand, as some professional systems require particular wavelengths for optimal curing.
Prepare Nails Properly for Gel Application
Skipping proper prep is the number one cause of gel lifting and premature chipping. Clean, dry nails are essential for strong adhesion that lasts for weeks.
File and Shape Your Nails
Use a 180-grit nail file to shape tips and shorten length according to your preferred style. Gently buff the entire nail surface to remove shine, as this rough texture helps the base coat adhere properly. Never file too aggressively, as over-buffing weakens natural nails and can cause damage.
Cleanse and Dehydrate the Nail Plate
Push back cuticles carefully using an orange stick or metal pusher. Wipe each nail thoroughly with 99% isopropyl alcohol using a lint-free wipe to remove all oils and residue. Avoid applying any moisturizers, creams, or cuticle oils before application, as these create a barrier that prevents proper adhesion.
Warning: Applying gel over oily or greasy nails causes immediate peeling. Skip all cuticle conditioning products until after your manicure is fully complete.
Apply Base Coat for Strong Adhesion
The foundation of your manicure starts here. A well-applied base coat prevents chipping, yellowing, and premature lifting.
Apply Thin, Even Layers
Squeeze a small drop of base coat onto each nail and paint from cuticle to tip, staying just short of the skin. Use one stroke down the center followed by one on each side for complete coverage. Work quickly but precisely on one hand before moving to curing.
Mistake to Avoid: Getting base coat on cuticles leads to lifting. Clean edges immediately with a damp brush if contact occurs.
Cure Base Coat Correctly
Place your hand flat into the lamp with all fingers positioned properly. Set the timer according to your lamp type, then wait for the complete cycle to finish before removing your hand. For LED lamps, cure for 30 to 45 seconds. For UV lamps, cure for 2 minutes. Repeat the process for your second hand if curing one at a time.
Apply Gel Color in Thin, Controlled Coats
Thick layers cause bubbling, wrinkling, and incomplete curing. Less is always more when it comes to gel polish application.
First Color Coat Application
Apply a sheer first layer, remembering that gel should look slightly translucent when first applied. Keep the polish away from skin and sidewalls to prevent lifting. Cap the free edge by swiping the brush across the tip to seal and prevent chipping. Cure for 30 seconds on LED or 2 minutes on UV lamps.
Second and Optional Third Coats
After curing the first coat, apply a second thin layer for full opacity. Re-cap the free edge and cure again using the same timing. Some dark or glitter gel polishes may require a third coat for complete coverage. Always cure each layer individually rather than attempting to speed up the process.
Seal With Top Coat for Professional Finish
Lock in color and add that signature glossy shine with a proper top coat application.
Apply Final Protective Layer
Use a quality gel top coat to seal the entire nail surface, ensuring full coverage especially at the tip. Avoid pooling at the cuticle area, as excess product can cause lifting during wear. The top coat protects all underlying layers from chips and scratches.
Remove the Sticky Inhibitor Layer
Cure the top coat for 30 to 60 seconds on LED or 2 minutes on UV. After curing, wipe each nail with 99% isopropyl alcohol to remove the sticky inhibiting layer left behind by most gel polishes. This step reveals the true glossy finish and removes any tackiness.
Exception: No-wipe top coats do not leave residue, so skip the alcohol step entirely if using this product type.
Position Hands Correctly for Even Curing

Poor hand placement causes uneven shine, soft spots, and peeling that ruins your manicure before it even finishes curing.
Align Fingers with Built-in Markers
Many lamps feature oval guides on the base. Place your thumb on the marked spot first, then align your remaining fingers accordingly. If your lamp has no markers, simply space fingers evenly without allowing any to overlap.
Keep Hands Flat and Completely Still
Rest your wrist on the table to stabilize your hand position throughout the cure cycle. Insert hands straight into the lamp without twisting or tilting. Hold your position for the entire cycle, as movement creates shadows and leads to under-cured areas.
Adjust for Long Nails or Decorative Art
Slide hands in only until your fingertips are directly under the LED array. For 3D nail art designs, angle carefully to avoid crushing delicate details. Some lamps offer fingertip mode specifically designed for extended nails.
Visual Cue: All nails should be directly beneath the LED array with no part remaining in shadow or outside the light coverage area.
Protect Skin From UV Exposure During Curing
While the cancer risk from occasional use is considered minimal by medical research, protecting your skin from repeated UV exposure is still smart practice.
Apply Sunscreen or Wear Protective Gloves
Use SPF 30 or higher broad-spectrum sunscreen on the backs of your hands before curing. Apply carefully, avoiding the nail surface itself, as sunscreen on nails can block proper adhesion and cause peeling.
Scientific Note: Studies cited by Harvard Medical indicate minimal cancer risk from occasional home lamp use, but cumulative exposure should be managed, especially for frequent users.
The better option for regular users is wearing fingerless UV-protective gloves that expose only the nails while protecting the skin.
Limit Curing Time to Manufacturer Recommendations
Never over-cure your nails. Additional time does not strengthen the gel, it only increases unnecessary UV exposure. Follow the manufacturer times exactly for best results. Avoid looking directly at the bright light, as LEDs can irritate eyes.
Remove Gel Polish Safely Without Damage
Peeling gel polish off damages your natural nails. Always use the proper soak-off method instead of forcing removal.
Prepare Nails for Soak-Off
Gently file the top coat with a 180-grit buffer to break the shiny surface. This allows the acetone to penetrate and dissolve the gel effectively. Do not aggressively file down to the natural nail bed.
Soak With Acetone for Effective Removal
Soak a cotton ball in 100 percent pure acetone and place it directly on each nail. Wrap each finger with aluminum foil to hold the cotton in place and trap heat. Wait 10 to 15 minutes for the gel to soften and lift.
Time Saver: Use a heated bowl or thermal mitt to speed up the removal process significantly.
Gently Wipe Off Softened Gel
After soaking, gently push off the softened gel using an orange stick or cuticle pusher. If any gel remains attached, re-wrap and wait an additional 5 minutes. Never scrape or force remaining gel off, as this damages the natural nail surface.
Finish by applying cuticle oil to restore moisture and nourish your nails after the removal process.
Clean and Maintain Your Nail Lamp Regularly
A dirty lamp with gel buildup reduces curing power and can shorten effective bulb life significantly.
Wipe Interior After Every Few Uses
Unplug the lamp and let it cool completely before cleaning. Use a dry microfiber cloth to wipe the reflector and base interior. For stuck-on gel residue, lightly dampen the cloth with water or mild cleaner.
Never use acetone or alcohol inside the lamp, as these chemicals can damage plastic components or protective coatings.
Store Properly to Extend Lifespan
Keep your lamp in a dry, dust-free area away from humidity. Cover the lamp when not in use to prevent dust accumulation on the interior surfaces. Store gel polishes upright in a cool, dark location to prevent thickening and extend their usable life.
Replace bulbs only if you notice curing times increasing significantly, as most quality LEDs last well beyond 50,000 hours.
Troubleshoot Common Problems Quickly
Fix issues fast with these targeted diagnostic solutions for the most frequent gel manicure problems.
Nails Not Curing Properly
When gel remains tacky or soft after curing, the cause is usually thick application, expired polish, or an underpowered lamp. Apply thinner coats in the future, check expiration dates on your gel products, and consider upgrading to a 48-watt or higher lamp for more effective curing power.
Gel Peeling or Lifting Prematurely
Peeling usually stems from oily nails, cuticle contamination, or incomplete curing. Deep clean nails with alcohol before application, avoid getting any product on skin, and ensure you cure each layer for the full recommended time.
Wrinkled or Bubbled Finish
Heat wrinkles and bubbles form from overheating or applying layers that are too thick. Use thin, even coats and ensure your lamp vents are not blocked for proper airflow. If your lamp runs very hot, consider shorter cure times between applications.
Sticky Residue Will Not Wipe Off
Using hand sanitizer, water, or low-purity alcohol leaves residue behind. Use 99 percent isopropyl alcohol with lint-free wipes for complete removal of the inhibiting layer.
Lamp Not Turning On
Power issues typically stem from a faulty outlet, dead sensor, or loose adapter. Test different outlets, clean the sensor lens with a dry cloth, and check all power cord connections thoroughly.
Maximize Value With At-Home Gel Manicures
Your lamp pays for itself after just a few uses compared to salon pricing.
Cost Comparison Reveals Significant Savings
A single gel manicure at a salon typically costs 40 to 60 dollars. With an at-home setup, ongoing costs drop to under 5 dollars per manicure after your initial investment. The average initial investment of 80 to 100 dollars pays for itself after only two to three salon visits.
Tips for Consistent Salon-Worthy Results
Always cure each layer separately rather than attempting to speed up the process. Use thin, even coats for proper curing and a smooth finish. Follow brand-specific curing times exactly as different formulations require different exposure lengths. Keep both your nails and lamp clean for optimal results. In hot climates, refrigerate gel polishes to prevent thickening and extend their lifespan.
Frequently Asked Questions About UV Nail Lamps
How long should I cure each coat in a UV nail lamp?
For UV lamps, cure each layer for approximately 2 minutes. LED lamps typically require 30 to 60 seconds per coat. Always check your specific gel polish brand instructions, as formulations vary.
Can I use regular nail polish in a UV lamp?
No, regular nail polish cannot be cured under UV or LED lamps. Only gel-specific polishes that are UV-reactive will harden properly. Using regular polish in a lamp will not dry or set the product.
Is UV nail lamp exposure dangerous for my skin?
Research indicates minimal cancer risk from occasional home use. However, frequent users should apply SPF 30 sunscreen to hands or wear fingerless UV-protective gloves to minimize cumulative exposure over time.
Why does my gel polish peel off so quickly?
Premature peeling usually results from improper nail preparation, applying gel to cuticles, or under-curing. Ensure nails are completely clean and dry, avoid skin contact during application, and cure each layer for the full recommended time.
How do I know when gel is fully cured?
Properly cured gel will feel firm and smooth with no tackiness remaining. The surface should have a consistent glossy finish. If the polish feels flexible or sticky after curing, it likely needs additional time under the lamp.
Can I cure both hands at once in my nail lamp?
Only lamps with dual-hand capacity can cure both hands simultaneously. Standard single-hand lamps require curing one hand at a time. Consider upgrading to a larger lamp if saving time is important to you.
Key Takeaways for Perfect UV Nail Lamp Results
Mastering how to use a UV nail lamp gives you durable, glossy manicures anytime without salon prices. Choose a quality 48-watt LED or hybrid lamp for the best balance of speed and effectiveness. Prepare nails properly by cleansing with alcohol and avoid all moisturizers before application.
Apply all gel products in thin, even layers, curing each coat individually according to your lamp type. Protect your skin with sunscreen or fingerless gloves during the curing process. Remove gel polish safely using the acetone soak-off method rather than peeling.
With proper technique, quality products, and consistent maintenance, your gel manicures will last flawlessly for up to three weeks. The initial investment pays for itself within just a few uses, making at-home gel manicures an economical choice for beautiful, long-lasting results.